How to Turn Your iPod Nano into a Triple-Monitor Workstation (Sort Of)
Introduction
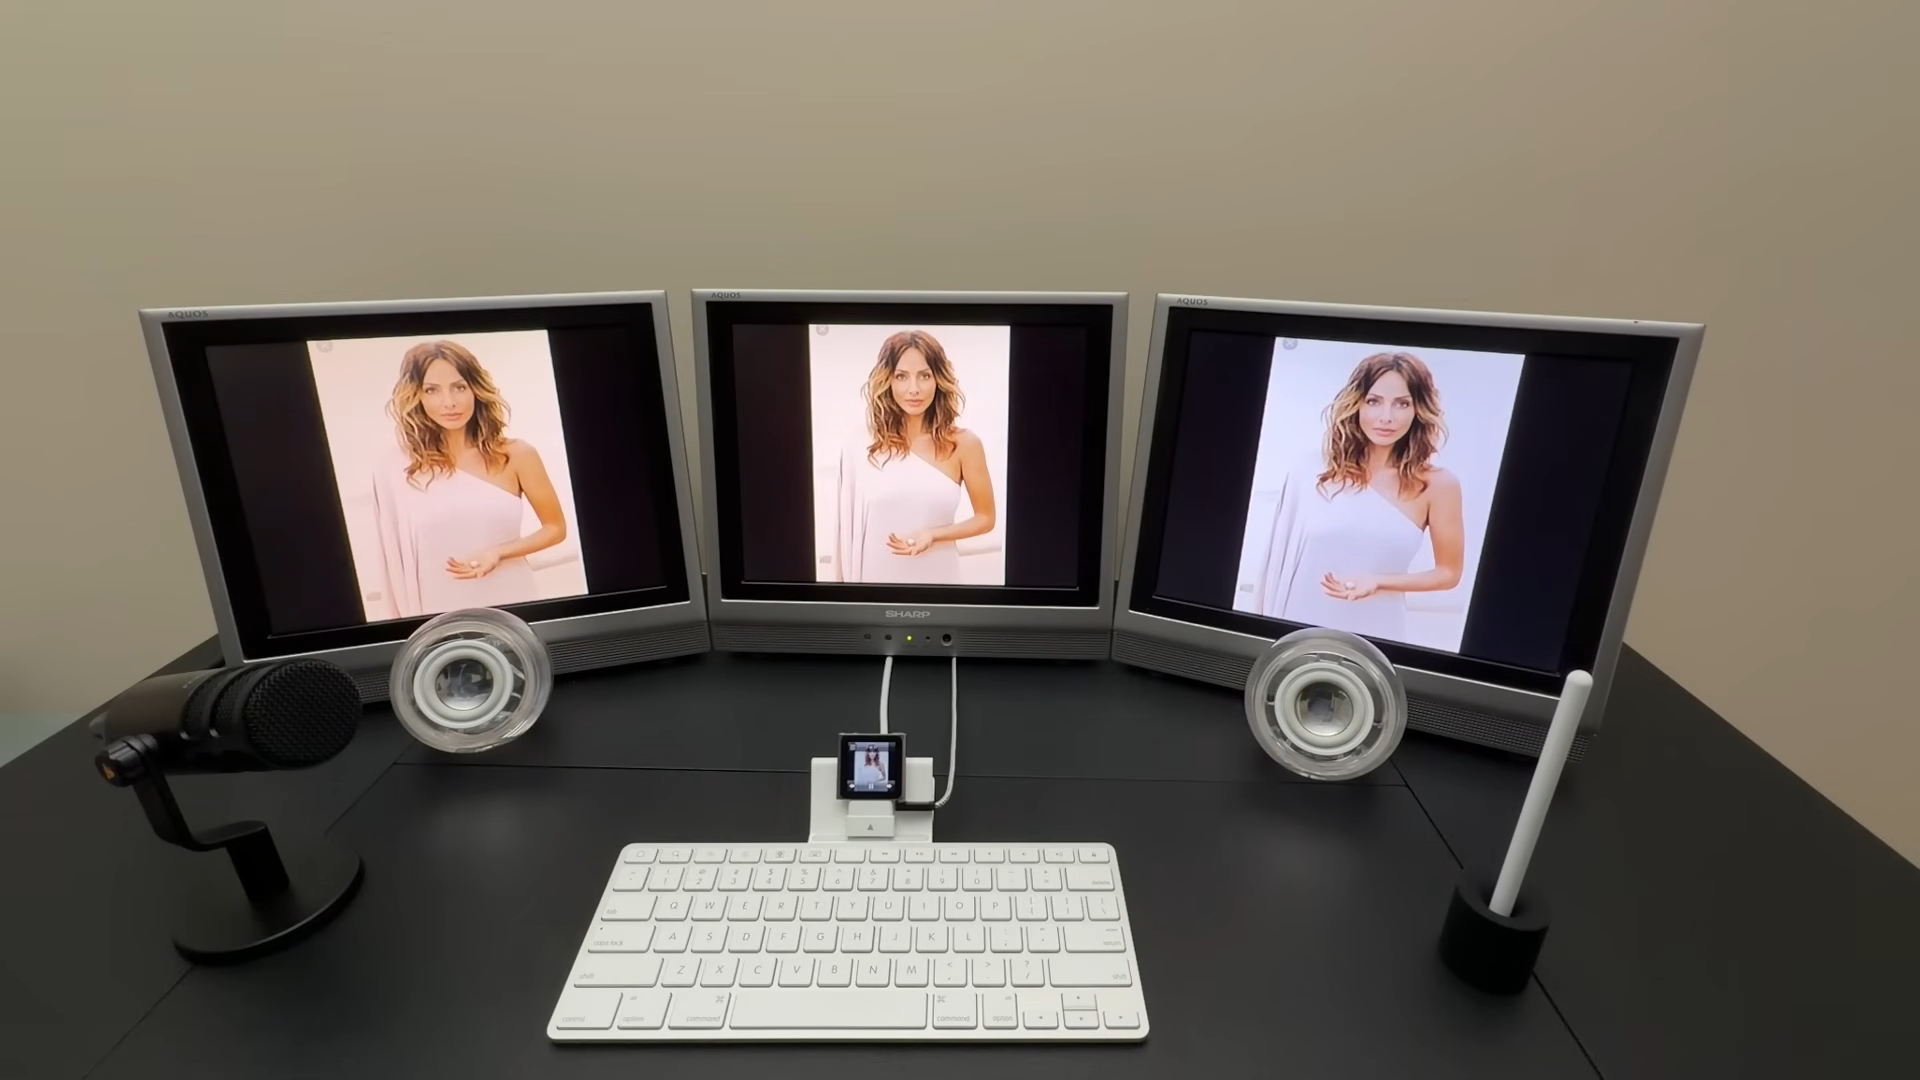
Triple-monitor setups are a staple for productivity enthusiasts, but what if you could achieve that look with a device smaller than a credit card? The 6th-generation iPod Nano—the one that clips to your gym shorts—can be tricked into powering three screens simultaneously. While it won't replace your desktop, this build is a hilarious conversation starter for your desk or podcast studio. Below we'll walk through the hardware and steps to replicate this retro-modern hack.
What You Need
- iPod Nano (6th generation) – the small, clip-on model with a 30-pin connector.
- Apple 30-pin Keyboard Dock – originally designed for iPad, but works with the Nano when paired with a spacer.
- 30-pin spacer adapter – a thin plastic or metal shim to ensure proper connection (common on eBay or 3D-printed).
- Composite video cables (RCA) – yellow video cable(s). You'll need at least one per monitor.
- Composite video distribution amplifier or splitter – to send the single video signal to three monitors simultaneously.
- Three monitors with composite video input – older LCD or CRT TVs work best; modern monitors may need an adapter.
- 3.5mm four-pole to dual RCA cable – to tap audio from the dock's headphone jack (optional for speakers).
- Apple Pro Speakers or any powered speakers – for audio output (optional).
- Miscellaneous adapters – RCA couplers, extension cables, power strips as needed.
Step-by-Step Instructions
-
Step 1: Prepare the Dock
Place the 30-pin spacer adapter onto the Keyboard Dock's connector. This lifts the iPod Nano enough to make electrical contact, as the dock was designed for a taller iPad. Ensure the spacer doesn't shift—use a small rubber band if needed.
-
Step 2: Connect the iPod Nano
Slide the iPod Nano onto the dock with the spacer. The screen should come on and the device will start charging. Nothing else will happen on the keyboard side—those keys won't interact with the Nano.
-
Step 3: Route Composite Video from the Dock
The Keyboard Dock exposes the iPod's composite video through its 30-pin port. Use a 30-pin to composite video cable (or a breakout board) to get a single yellow RCA feed. Plug that cable into the input of your composite video distribution amplifier.
-
Step 4: Distribute Video to Three Monitors
Connect the output of the distribution amplifier to each of the three monitors using standard composite video cables. Each monitor will display the same image—no extended desktop here. Turn on the monitors and set them to the correct input source.

Source: hackaday.com -
Step 5: Set Up Audio (Optional)
The dock's 3.5mm four-pole jack carries both audio in and out. Plug a four-pole to dual RCA cable into the dock, then connect the red/white RCA ends to your speaker system. This lets you play music or voice memos through the Apple Pro Speakers (or any powered speakers).
-
Step 6: Power Everything and Test
Plug in the dock's USB power cable (it uses the 30-pin to USB cable usually included). Ensure all monitors are receiving the video signal. Navigate the iPod Nano's touchscreen to play a slideshow, music, or a voice memo. All three screens will mirror exactly what's on the tiny display.
Tips & Tricks
- Keep your expectations low: The iPod Nano is not a multitasking powerhouse. You're limited to music, slideshows, and voice memos. Don't expect to run modern apps or browse the web.
- Show it off: This rig is a perfect prop for a podcast or a retro tech display. At first glance, visitors will think you've built a serious workstation for a tiny device.
- Consider a video splitter quality: Cheap composite splitters can degrade image quality. If you can, use a powered distribution amplifier for cleaner signals across all three screens.
- Alternative uses: Use the setup to display a static clock face, album art gallery, or a simple looping video. The novelty factor is high.
- Spacer adapter alternatives: If you can't find a pre-made spacer, a thin business card or plastic shim can work temporarily, but avoid shorting the pins.
- Longevity: The Nano's battery will drain slowly while docked. For continuous use, keep it connected to USB power via the dock.
Related Articles
- How to Grasp the Controversy Over Math's Foundational Axioms
- ACEMAGIC F5A Mini PC Upgraded with Ryzen AI HX 470 Processor and Enhanced Connectivity
- Understanding Cargo's New Build Directory Layout v2: A Q&A Guide
- Transform a Spare Keyboard Into a Powerful Macropad on macOS
- 10 Essential Facts About the New Python Environments Extension for VS Code
- Preparing Your JetBrains Plugin for Remote Development
- The Rise of Simulation-First Manufacturing: How Digital Twins and AI Are Transforming Production
- 10 Key Facts About Swift’s Expanding IDE Ecosystem